Appearance
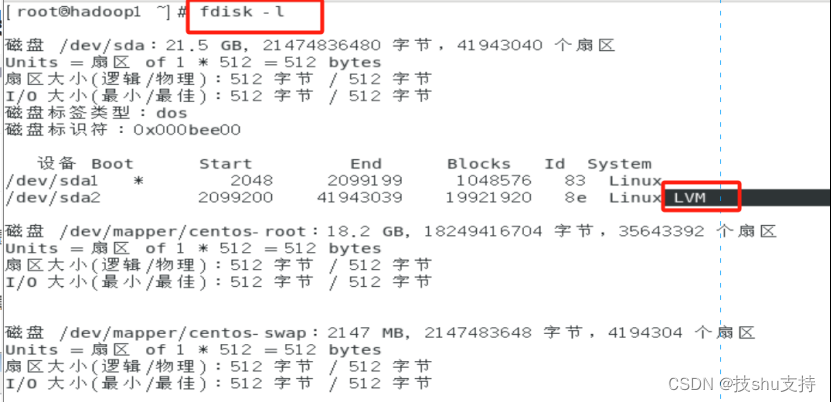
查看磁盘情况
新增磁盘扩容lvm分区
1、Centos 关机,选择编辑虚拟机设置,硬盘,在实用工具那里选择“扩展”(不建议快照,因为扩展不支持)
提示磁盘已成功扩展。您必须从客户机操作系统内部对磁盘重新进行分区和扩展文件系统。扩展的磁盘空间还没生效,需要在操作系统里面进行设置后才能使用。
2、启动客户机操作系统Centos,查看磁盘情况
新增或扩容后,可以通过命令:lsblk 或 fdisk -l 对磁盘大小的变化来判断是否有加载成功;
3、创建分区 sda3
输入指令fdisk /dev/sda
根据命令提示创建分区,具体见以下 # 后面的注释
shell
[root@hadoop1 ~]# fdisk /dev/sda
欢迎使用 fdisk (util-linux 2.23.2)。

更改将停留在内存中,直到您决定将更改写入磁盘。
使用写入命令前请三思。

命令(输入 m 获取帮助):m
命令操作
   a   toggle a bootable flag
   b   edit bsd disklabel
   c   toggle the dos compatibility flag
   d   delete a partition
   g   create a new empty GPT partition table
   G   create an IRIX (SGI) partition table
   l   list known partition types
   m   print this menu
   n   add a new partition
   o   create a new empty DOS partition table
   p   print the partition table
   q   quit without saving changes
   s   create a new empty Sun disklabel
   t   change a partition's system id
   u   change display/entry units
   v   verify the partition table
   w   write table to disk and exit
   x   extra functionality (experts only)
命令(输入 m 获取帮助):n     # 输入 n 表示创建新分区
Partition type:
   p   primary (2 primary, 0 extended, 2 free)
   e   extended
Select (default p): p     #
分区号 (3,4,默认 3):3    # 输入 3 表示sda3,因为前面已经有两个了
起始 扇区 (41943040-104857599,默认为 41943040):   # 回车,按默认值
将使用默认值 41943040
Last 扇区, +扇区 or +size{K,M,G} (41943040-104857599,默认为 104857599):   # 回车,按默认值
将使用默认值 104857599
分区 3 已设置为 Linux 类型,大小设为 30 GiB
命令(输入 m 获取帮助):w      # 输入 w 保存退出
The partition table has been altered!
Calling ioctl() to re-read partition table.
WARNING: Re-reading the partition table failed with error 16: 设备或资源忙.
The kernel still uses the old table. The new table will be used at
the next reboot or after you run partprobe(8) or kpartx(8)
# 正在同步磁盘。

# 再次查看分区情况:fdisk -l

[root@hadoop1 ~]# fdisk -l
   设备 Boot      Start         End      Blocks   Id  System
/dev/sda1   *        2048     2099199     1048576   83  Linux
/dev/sda2         2099200    41943039    19921920   8e  Linux LVM
/dev/sda3        41943040   1
分区已变为3个了,但这时还没挂载,还不能用
4、重启操作系统
reboot
5、格式化新分区为sda3
shell
mkfs -t ext3 /dev/sda3
[root@hadoop1 ~]# mkfs -t ext3 /dev/sda3
mke2fs 1.42.9 (28-Dec-2013)
文件系统标签=
OS type: Linux
块大小=4096 (log=2)
分块大小=4096 (log=2)
Stride=0 blocks, Stripe width=0 blocks
1966080 inodes, 7864320 blocks
393216 blocks (5.00%) reserved for the super user
第一个数据块=0
Maximum filesystem blocks=4294967296
240 block groups
32768 blocks per group, 32768 fragments per group
8192 inodes per group
Superblock backups stored on blocks:
	32768, 98304, 163840, 229376, 294912, 819200, 884736, 1605632, 2654208,
	4096000

Allocating group tables: 完成
正在写入inode表: 完成
Creating journal (32768 blocks): 完成
Writing superblocks and filesystem accounting information: 完成
6、将物理硬盘分区初始化为物理卷,以便被LVM使用,输入指令
shell
lvs
pvcreate /dev/sda3

[root@hadoop1 ~]# lvs
  LV   VG     Attr       LSize   Pool Origin Data%  Meta%  Move Log Cpy%Sync Convert
  root centos -wi-ao---- <17.00g
  swap centos -wi-ao----   2.00g
[root@hadoop1 ~]# pvcreate /dev/sda3
WARNING: ext3 signature detected on /dev/sda3 at offset 1080. Wipe it? [y/n]: y
  Wiping ext3 signature on /dev/sda3.
  Physical volume "/dev/sda3" successfully created.
7、向卷组中添加物理卷来增加卷组的容量
查看lvs组名,输入指令df -h
shell
[root@hadoop1 ~]# df -h
文件系统                 容量  已用  可用 已用% 挂载点
devtmpfs                 894M     0  894M    0% /dev
tmpfs                    910M     0  910M    0% /dev/shm
tmpfs                    910M   11M  900M    2% /run
tmpfs                    910M     0  910M    0% /sys/fs/cgroup
/dev/mapper/centos-root   17G   14G  3.5G   80% /
/dev/sda1               1014M  184M  831M   19% /boot
tmpfs                    182M  4.0K  182M    1% /run/user/42
tmpfs                    182M   20K  182M    1% /run/user/0
/dev/sr0 4.4G 4.4G 0 100% /run/media/root/CentOS 7 x86_64其中,centos 就是 根 所在的组名
输入指令,增加卷组的容量
shell
vgextend centos /dev/sda3

[root@hadoop1 ~]# vgextend centos /dev/sda3
  Volume group "centos" successfully extended
查看可拓展的空间大小
输入指令,显示LNM卷组的元数据信息vgdisplay
9、扩充磁盘空间
shell
lvextend -l +100%FREE /dev/mapper/centos-root

root@hadoop1 ~]# lvextend -l +100%FREE /dev/mapper/centos-root

  Size of logical volume centos/root changed from <17.00 GiB (4351 extents) to 46.99 GiB (12030 extents).

  Logical volume centos/root successfully resized.
10、使用 指令检查文件系统错误
shell
xfs_growfs /dev/mapper/centos-root

[root@hadoop1 ~]# xfs_growfs /dev/mapper/centos-root
meta-data=/dev/mapper/centos-root isize=512    agcount=4, agsize=1113856 blks
         =                       sectsz=512   attr=2, projid32bit=1
         =                       crc=1        finobt=0 spinodes=0
data     =                       bsize=4096   blocks=4455424, imaxpct=25
         =                       sunit=0      swidth=0 blks
naming   =version 2              bsize=4096   ascii-ci=0 ftype=1
log      =internal               bsize=4096   blocks=2560, version=2
         =                       sectsz=512   sunit=0 blks, lazy-count=1
realtime =none                   extsz=4096   blocks=0, rtextents=0
data blocks changed from 4455424 to 12318720
11、使用指令来增大或者收缩未加载的 文件系统的大小
shell
xfs_growfs -d /dev/mapper/centos-root

[root@hadoop1 ~]# xfs_growfs -d /dev/mapper/centos-root
meta-data=/dev/mapper/centos-root isize=512    agcount=12, agsize=1113856 blks
         =                       sectsz=512   attr=2, projid32bit=1
         =                       crc=1        finobt=0 spinodes=0
data     =                       bsize=4096   blocks=12318720, imaxpct=25
         =                       sunit=0      swidth=0 blks
naming   =version 2              bsize=4096   ascii-ci=0 ftype=1
log      =internal               bsize=4096   blocks=2560, version=2
         =                       sectsz=512   sunit=0 blks, lazy-count=1
realtime =none                   extsz=4096   blocks=0, rtextents=0
data size unchanged, skipping
12、查看扩展空间后的结果
shell
[root@hadoop1 ~]# df -h
文件系统                 容量  已用  可用 已用% 挂载点
devtmpfs                 894M     0  894M    0% /dev
tmpfs                    910M     0  910M    0% /dev/shm
tmpfs                    910M   11M  900M    2% /run
tmpfs                    910M     0  910M    0% /sys/fs/cgroup
/dev/mapper/centos-root   47G   14G   34G   29% /
/dev/sda1               1014M  184M  831M   19% /boot
tmpfs                    182M  4.0K  182M    1% /run/user/42
tmpfs                    182M   20K  182M    1% /run/user/0
/dev/sr0                 4.4G  4.4G     0  100% /run/media/root/CentOS 7 x86_64

# 或者通过命令: lsblk 或fdisk -l 对磁盘大小的变化来判断是否有加载成功;